2020-09-05
Uniswap v2 (as a Developer)
Introduction
Uniswap is a platform (or protocol) on Ethereum to swap either Tokens<->Ether (V1) or Tokens<->Tokens (V2). But how does Uniswap work as an integration to your website? Here is my step by step walk-through, from a developers perspective. A walk-through I wish I had three weeks ago.
 When you look at the uniswap documentation then you see an SDK in Javascript, you see Smart Contracts documentation which use contracts in two different repositories and you also find Custom Linking and Iframe Integration. All of them cover a specific angle of requirements. All of this is pretty awesome, considering the small team and the little resources they have.
But practically, when you try to do an *actual *integration, you need working examples. Here is what I didn'tfind, but would have desperately needed: Use-case scenarios or step-by-step walk-through guides for developers. Instead, I found a somewhat incomplete and, in my opinion, subtly arrogant getting-started tutorial ("We will leave that as an exercise to the reader."). Now that I could put the puzzle pieces together, I understand that the Uniswap - Team is very small and it's no big deal to integrate with Uniswap, but when everything was new, it was off-putting and not helpful for me. So, I sat down to write this guide - I hope it helps someone out there.
I did a deep integration of Uniswap for https://morpher.com (you can see a working example there soon btw!). We needed not just a forwarding link to Uniswap or an IFrame implementation. When you look at a classical platform like morpher.com, then you find a DApp that works as a Single Page Application (SPA). [
Morpher - Trade 24/7 with Zero Fees and Infinite Liquidity
Discover your trading edge with 24/7 Stocks. Go long and short on global stocks, crypto, forex, and commodities. Zero Fees. Start Investing with $1.
![]() Trade 24/7 with Zero Fees and Infinite Liquidity
Trade 24/7 with Zero Fees and Infinite Liquidity
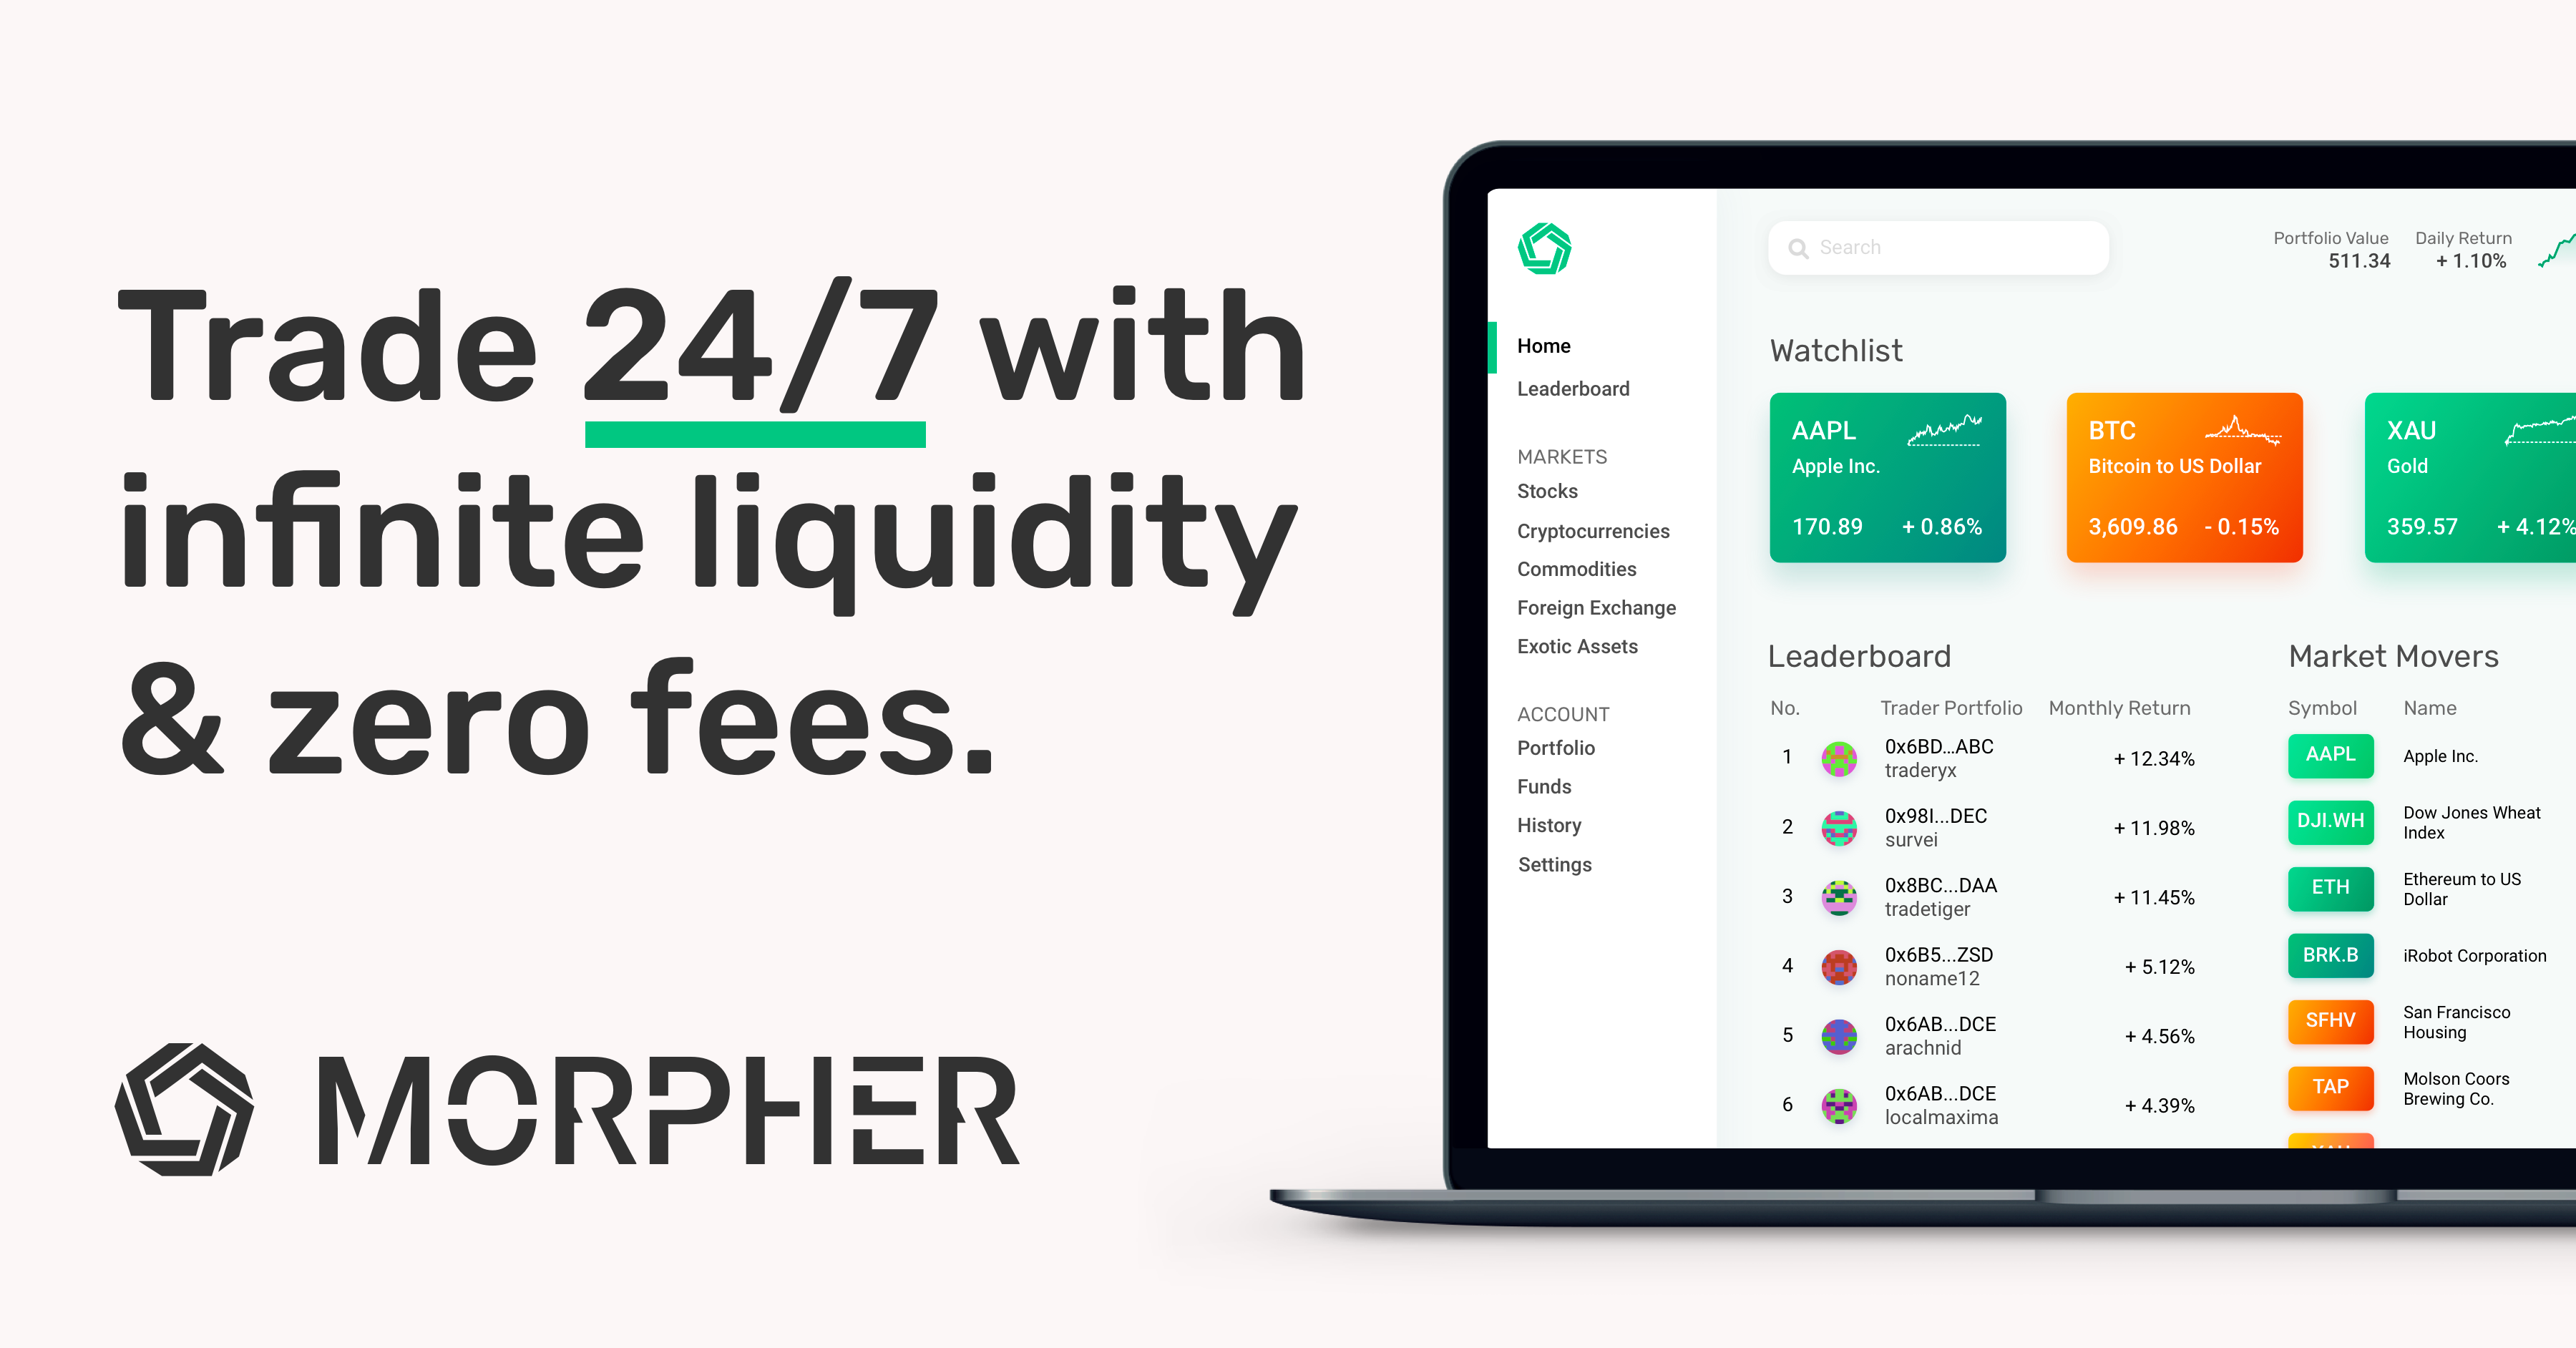 ](https://www.morpher.com)Curious how to trade 24/7 with Zero Fees and Infinite Liquidity on Ethereum? Check it out now and get a pre-funded account today!
The users feel like they are in our ecosystem -- because they are. They should be able to buy and sell tokens with a hassle free experience. Without leaving that ecosystem at all. Meaning, they should stay logged in and authorized with their already logged in Wallet (like Fortmatic), or without the need to re-authorize MetaMask. They should be able to use whatever they already feel comfortable to use.
](https://www.morpher.com)Curious how to trade 24/7 with Zero Fees and Infinite Liquidity on Ethereum? Check it out now and get a pre-funded account today!
The users feel like they are in our ecosystem -- because they are. They should be able to buy and sell tokens with a hassle free experience. Without leaving that ecosystem at all. Meaning, they should stay logged in and authorized with their already logged in Wallet (like Fortmatic), or without the need to re-authorize MetaMask. They should be able to use whatever they already feel comfortable to use.
“A consistent experience is a better experience.” — Mark Eberman
So, essentially prices, directly on *our *website. And a button to buy or sell tokens. Again, directly on *our *website. How difficult can it really be? Spoiler: It's not difficult at all, if you know what you're doing.
There are multiple ways to achieve this. And this article describes a couple of use cases which I could not find on the Uniswap documentation website and nowhere else on the web as a step-by-step guide.
Uniswap
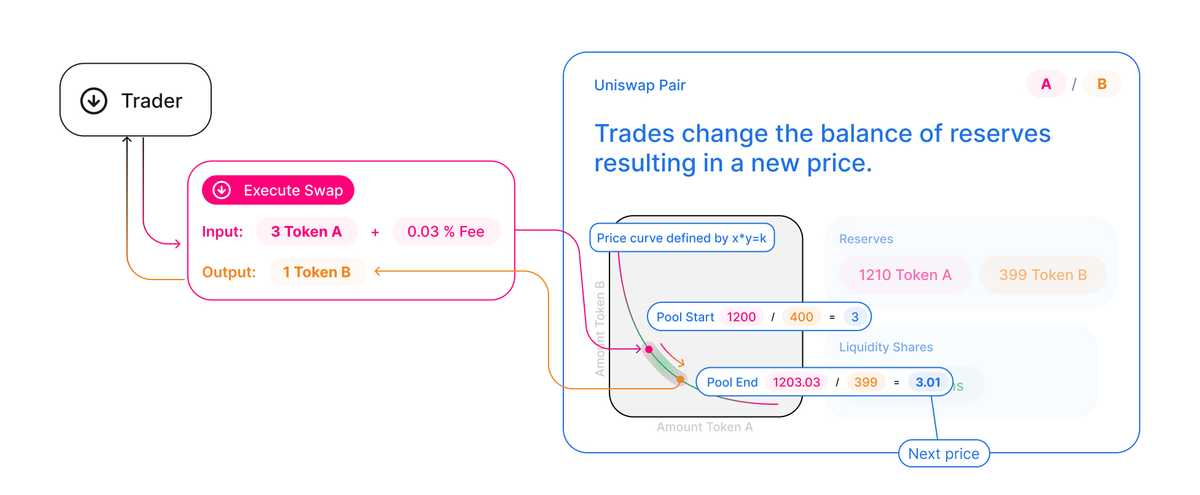
Uniswap is using a constant product formula (x*y=k) to swap from Token A to Token B. This works different than traditional exchanges with an order book. With Uniswap you first add liquidity, so, reserves for Token A and/or Token B. This manipulates the formula and therefore any token price between A and B. And any swap between A and B must still satisfy the constant product formula and therefore only changes the price of the Tokens.
As it turns out, using this formula (over an order book) works remarkably well, despite its simplicity.
There is an extensive write-up about this (and also how to use it for arbitrage) from the Stanford university. Uniswap can use the atomicity of transactions and the composability of the smart contracts to arbitrage between multiple coins. This means you could swap from Ether to DAI, use that DAI in some other contract/project, get the DAI back and swap it back to Ether - all within one single transaction. If one method call fails then the transaction fails and everything is rolled back. But that is beyond this tutorial.
The Flow
Add Liquidity
The first thing on your journey to learning Uniswap is to know how to add Liquidity.
 If you add liquidity to Uniswap, you always need to match it with two pairs. So, for example you need to add your Token A on the one side, and Ether (which gets automatically converted to WETH) on the other side of the equation. This will increase the reserves for a pair.
If the pair is not in the system yet, then it will be deployed. Deployment works using the CREATE2 method, using the address of the *factory *(the uniswap "mothership"), the address of Token A and the address of Token B, to deploy the pair. Once a pair is created on the blockchain it can't be overwritten anymore. It's unique between two tokens.
Checkout the code when you call, for example, addLiquidityETH:
- It tries to create a new Pair, if it doesn't exist yet:
if (IUniswapV2Factory(factory).getPair(tokenA, tokenB) == address(0)) { IUniswapV2Factory(factory).createPair(tokenA, tokenB);} - And then it fetches the new pair with
UniswapV2Library.pairFor(factory, tokenA, tokenB);
The Pair Address is deterministic. Given two tokens-addresses A and B and a factory-address C it will always re-create the pair-address D. If all of them were created with the CREATE2 opcode, then the Pair-Addresses stay constant, no matter on which network. Which is pretty cool to be honest.
In more detail, to get or create the address in UniswapV2Library, this is what happens:
- It sorts the addresses for tokenA and tokenB, so they can't be mixed up.
- It creates an address with
pair = address(uint(keccak256(abi.encodePacked(hex'ff',factory,keccak256(abi.encodePacked(token0, token1)),hex'96e8ac4277198ff8b6f785478aa9a39f403cb768dd02cbee326c3e7da348845f' // init code hash))));
This address is always unique between two tokens and it will be used to create a Pair.
Add Liquidity with Ether in Version 2
Version 2 of Uniswap only supports Token to Token transfer.
When we add liquidity as Ether, not as a token, it will automatically put the Ether into a WETH ERC20 Token Smart Contract where the exchange rate between 1 WETH and 1 ETH is always 1:1. You put one Ether in you get 1 WETH in return and vice versa.
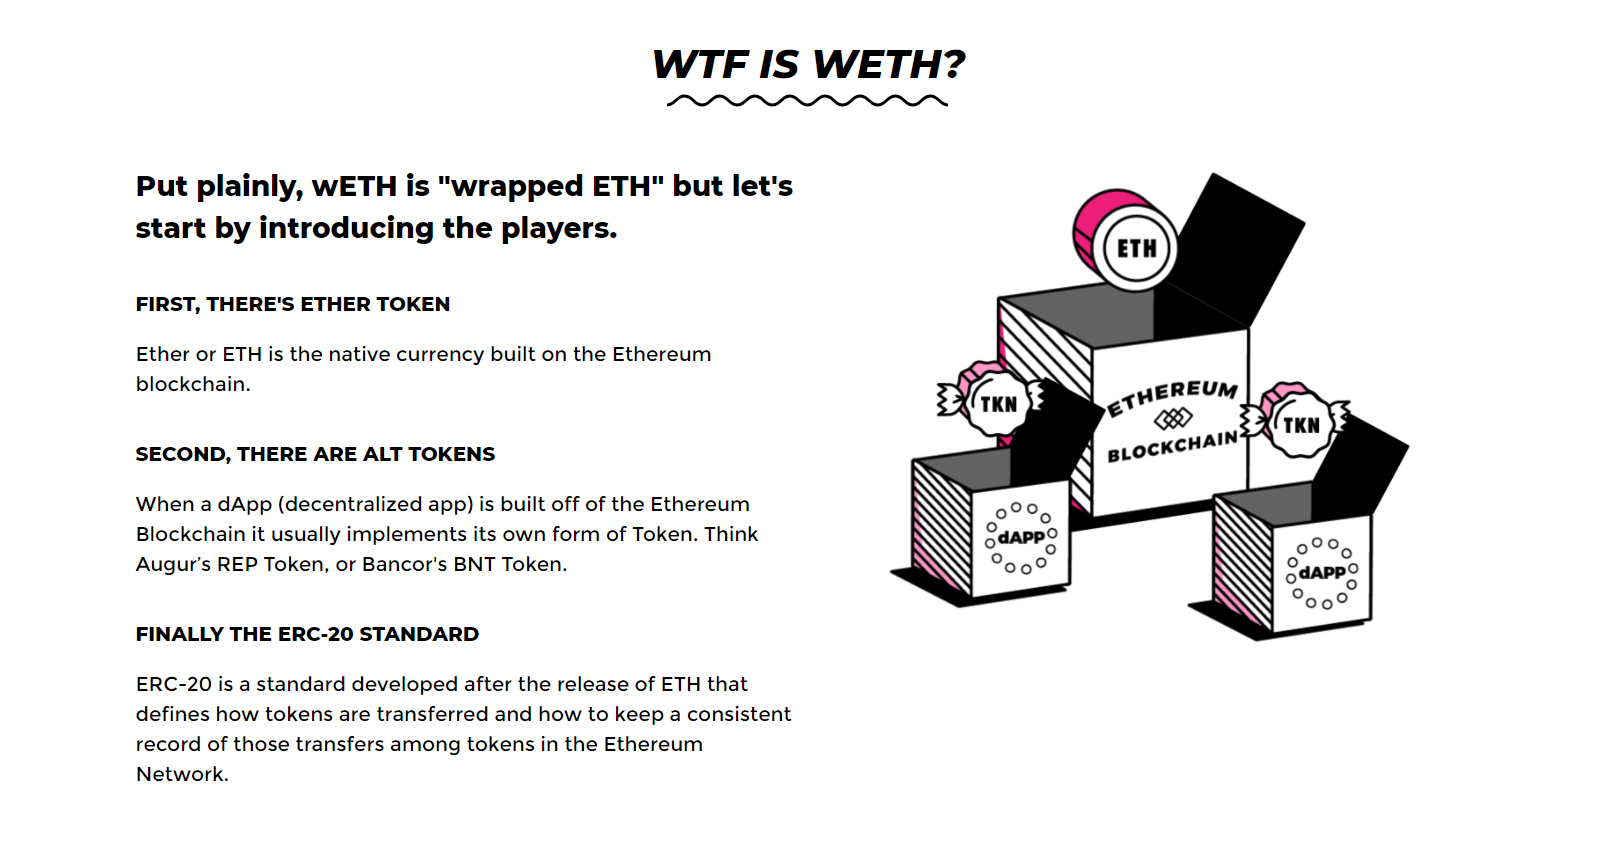 The cool thing about this is the ERC20 Interface you get. You can give allowance to anyone to use (W)ETH in your name, which is exactly what makes Uniswap work. For a swap you must authorize the Router of Uniswap to trade ETH in your name, more on that later.
Okay, so we get a Pair of Tokens, let's say TOK<->WETH. What can these pairs actually do then, and why are they so important?
Pairs, Reserves and Prices in Uniswap V2
In Uniswap, when you want to swap Token A for Token B, it has to reduce the reserves on one side without compromising the constant product.
 https://uniswap.org/docs/v2/core-concepts/swaps/
Before it can do this, it has to calculate the current price for the token. This is done using the amount of reserves.
https://uniswap.org/docs/v2/core-concepts/swaps/
Before it can do this, it has to calculate the current price for the token. This is done using the amount of reserves.
But, even before it can actually do that, it needs to have some reserves. Let's get a little bit more hands on now and add some Liquidity and see what exactly happens...
Let's use MetaMask, Remix, OpenZeppelin and the Kovan chain for this example.
 If any of those is completely new to you, checkout my Ethereum Developer Video-Course on Udemy, which explains everything from A to Z and is updated at least once a month to reflect latest changes in the Ecosystem.
Add Liquidity on Uniswap Example
When liquidity is added for the first time with UniswapV2Router::addLiquidityETH, it needs to get a token. Let's deploy a token for testing on Kovan.
Open Remix and add the following ERC20 Sample token from OpenZeppelin:
// SPDX-License-Identifier: MIT
pragma solidity ^0.6.0;

import "https://github.com/OpenZeppelin/openzeppelin-contracts/blob/master/contracts/token/ERC20/ERC20.sol";

contract SampleToken is ERC20 {
    constructor(uint256 initialSupply) public ERC20("SampleToken", "TOK") {
        _mint(msg.sender, initialSupply);
    }
}
The token we are about to deploy will have 18 decimals, like Ether, and we will deploy 100 of them, so the initial supply will be 100 + 18-zeros: 100000000000000000000
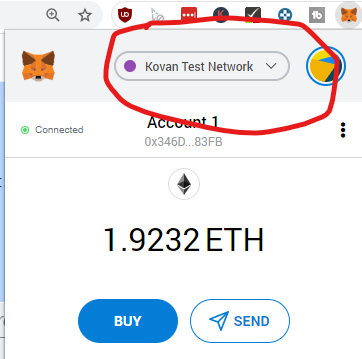 From MetaMask Select 'Kovan' as the Test-Network
*If you need Test-Ether on Kovan go to *https://faucet.kovan.network/and login with GitHub!
From MetaMask Select 'Kovan' as the Test-Network
*If you need Test-Ether on Kovan go to *https://faucet.kovan.network/and login with GitHub!
Then Deploy the Smart Contract with Remix:
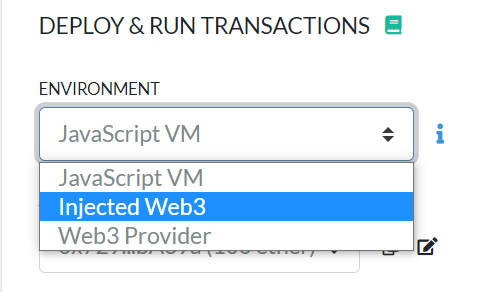 Select the Injected Web-Provider from Remix
And then deploy the token to Kovan using Remix:
Select the Injected Web-Provider from Remix
And then deploy the token to Kovan using Remix:
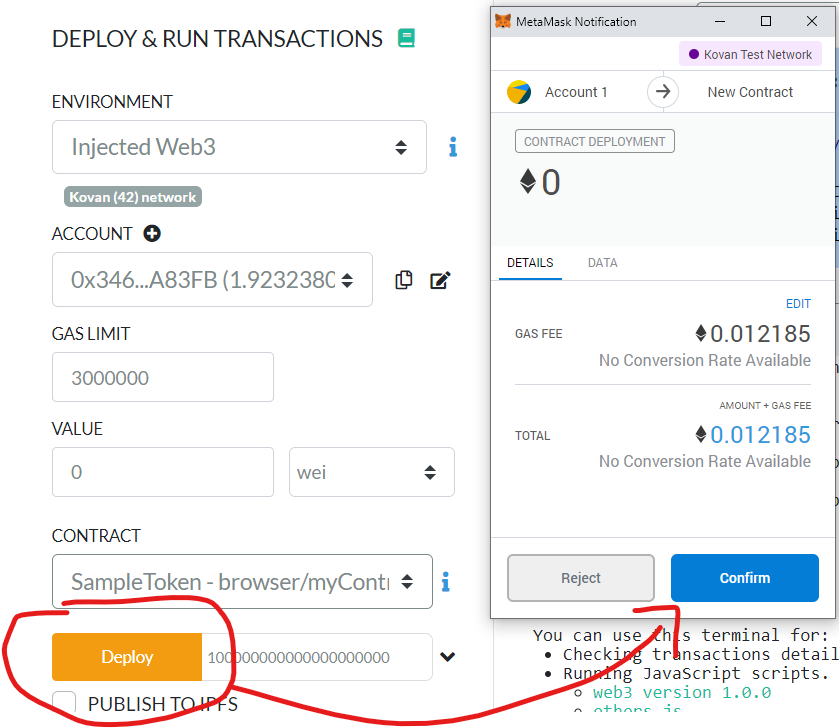 First hit "Deploy" and then "Confirm" in the MetaMask popup
Wait until the Transaction is mined and note down the address of the Token. In the current version of the Remix UI the copy button is a bit hidden:
First hit "Deploy" and then "Confirm" in the MetaMask popup
Wait until the Transaction is mined and note down the address of the Token. In the current version of the Remix UI the copy button is a bit hidden:
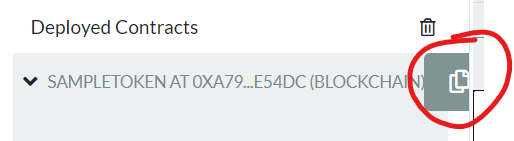 The token-address for me is: 0xA795DA6ed61D4AD2baA50D9Bc7aa231f218E54Dc
Now, to add Liquidity, there are a number of ways to do this.
Uniswap App
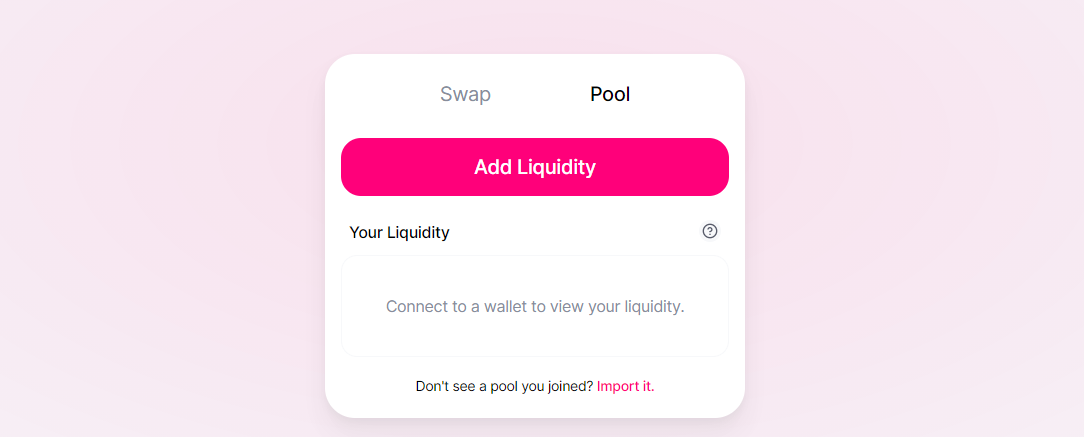
Through the Uniswap UI on https://app.uniswap.org. Connect MetaMask and then go to "Pool" and enter your Token Address.
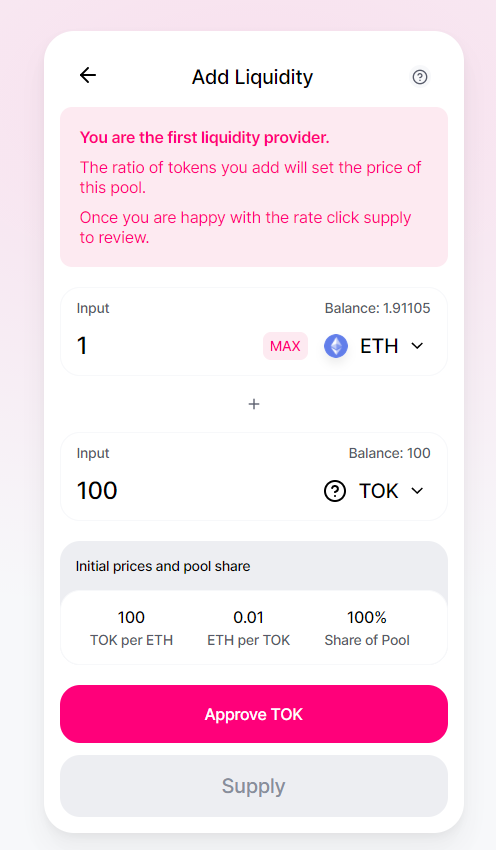 You see it takes two steps to actually add liquidity:
- Approve the Token
ERC20::approve(address _spender, uint256 _amount) - Supply the Liquidity through
UniswapV2Router02::addLiquidityETH(...).
What happens internally is that the ERC20 Interface of the Token is called, so that the Uniswap Router, which address is across the Main-Net and the Test-Networks the same (0x7a250d5630B4cF539739dF2C5dAcb4c659F2488D) needs to be able to transfer the tokens away in your name to the Pair Smart Contract that is either created or fetched, to increase the reserves.
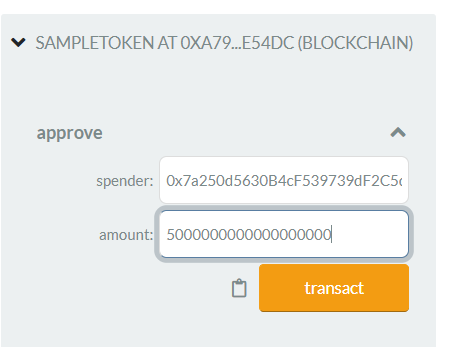
Approve with Remix
So, the UI of app.uniswap.org actually just fetches the current allowance for the Uniswap Router and shows the Approve TOK button, if the allowance is too little.
Instead of increasing the Allowance via the Uniswap UI, let's directly interact with our ERC20 Token via Remix:
- Take the Address of the UniswapV2Router02
- Add allowance for the Router to transfer tokens away in your name
Instead of 100 Tokens, let's first add Liquidity for 5 Tokens. 5 Tokens vs 1 Ether. Be careful on the Remix UI, because it is in the smallest possible unit, meaning 5 Tokens = 5000000000000000000 (5 with 18 zeros).
 Send the transaction off and re-visit the Uniswap UI:
 It won't show you the Approve TOK if the already approved amount is enough to Supply the Liquidity
Now we could use Uniswap to supply the tokens. We won't. And before we do anything else, let's be aware of what exactly happens here:
It won't show you the Approve TOK if the already approved amount is enough to Supply the Liquidity
Now we could use Uniswap to supply the tokens. We won't. And before we do anything else, let's be aware of what exactly happens here:
The UI would now call UniswapV2Router02::addLiquidityETH and would send Ether along. This function takes a few arguments, let's see what they are and why:
- The Address of the token: ok, that's pretty clear
- amountTokenDesired: That is the amount of tokens we want to add to the liquidity pool
- amountTokenMin and amountETHMin: If the liquidity pool is not empty, then there liquidity should be added at the current conversion rate. If liquidity is added at a different rate it might burn you, read more here.
Add Liquidity with Remix
Now, let's add liquidity using Remix instead of the Uniswap UI. For this we could either import the whole Router, which, unfortunately doesn't work at this point because of the node imports. So we can't do:
pragma solidity 0.6.6;
import "https://github.com/Uniswap/uniswap-v2-periphery/blob/master/contracts/UniswapV2Router02.sol";
It will give us:
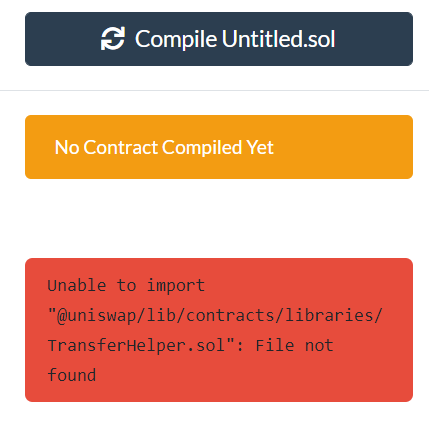 That means we have to mimic the Interface in Remix.
As you are probably aware, any transaction sent in Ethereum is the encoded function signature along with their values. So, when we send the transaction across the network, all we need is to know the function and the arguments (and their types) to mimic a contract interaction.
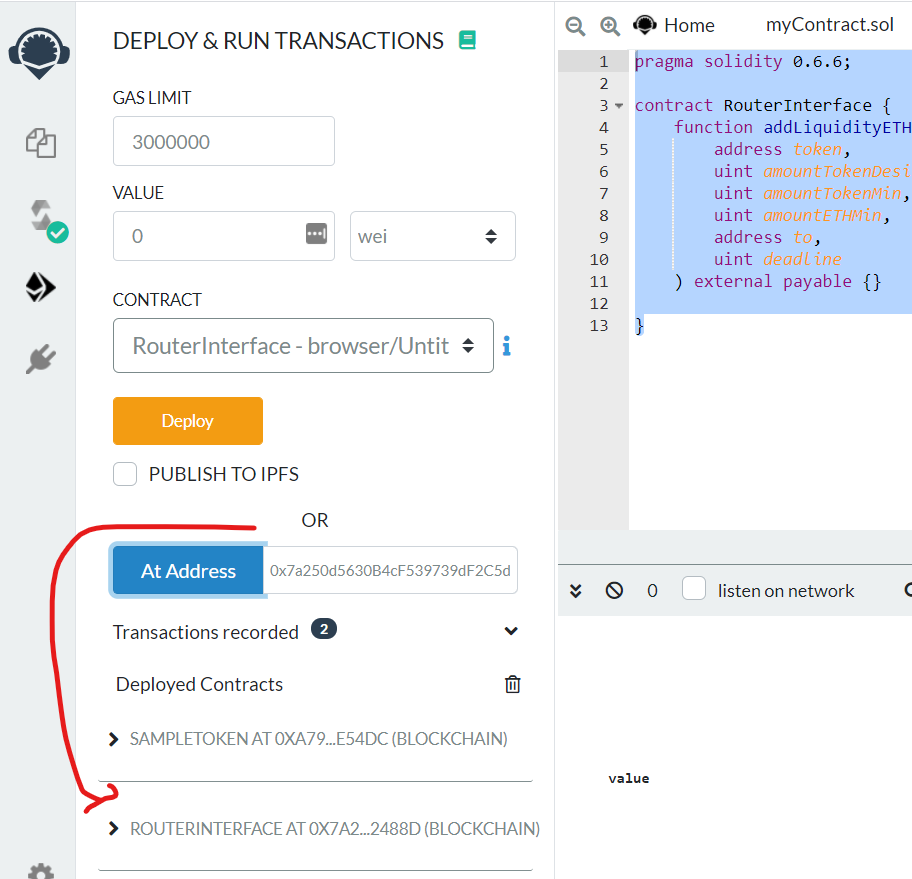
Let's add the following smart contract to Remix then:
pragma solidity 0.6.6;

contract RouterInterface {
    function addLiquidityETH(
        address token,
        uint amountTokenDesired,
        uint amountTokenMin,
        uint amountETHMin,
        address to,
        uint deadline
    ) external payable {}

}
And then we tell Remix that this smart contract is already deployed at the UniswapV2Router02 address (0x7a250d5630B4cF539739dF2C5dAcb4c659F2488D)
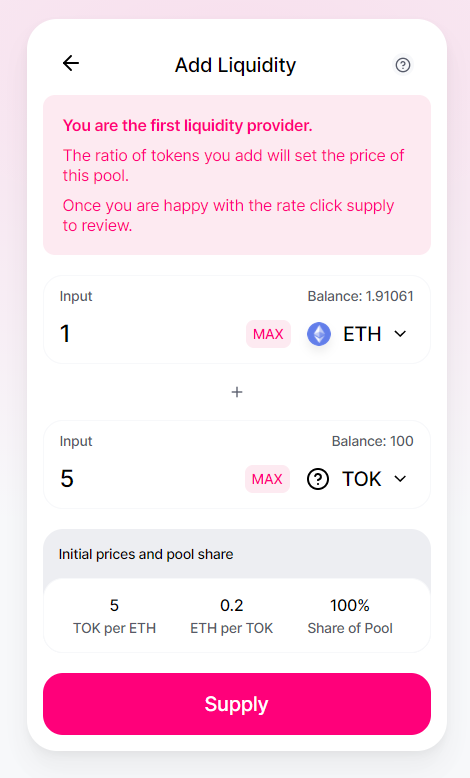
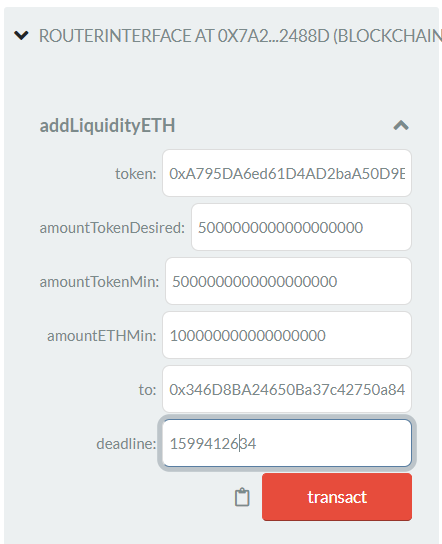
 And now let's add some liquidity. Let's say 1 Ether gives you 5 Tokens. In the fields we enter the Token address that we deployed earlier. We are setting the initial price to 0.02 Ether per Token, or 5 Tokens and 0.1 Ether.
So:
- amountTokenDesired = 5 * 10 ^18 (5 and 18 zeros)
- amountTokenMin = amountTokenDesired because it's the first time we add liquidity
- amountEthMin = 1 * 10 ^17 (1 and 17 zeros, or 0.1 Ether)
- to = your address, because you're the one who gets the fees later
- deadline is a unix timestamp in the future. I got mine from https://www.unixtimestamp.com/index.php and add a few minutes to it (+300 seconds)
 Before we hit transact we also have to change the settings on the top of the form, so we will send 0.1 Ether along:
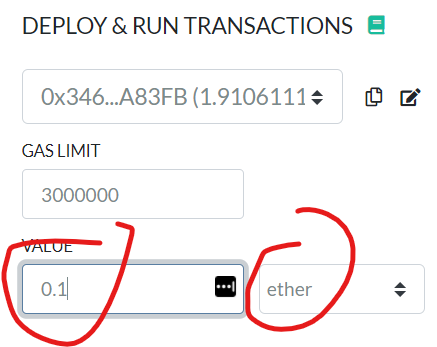 Now hit *transact *and confirm the transaction. This is my transaction on Etherscan https://kovan.etherscan.io/tx/0xc8ed21632ba64b4f1586d4f8bd551893b623f2a5b10dd36e34bfad9ac9d51d93
Getting Quotes and Prices On Uniswap, Programmatically
Now that we have the liquidity, it should be easy to get the prices. It actually is easy once you understand how the router works and how the smart contracts work.
When you buy tokens with Ether, which is probably one of the most common scenarios, you'd call swapETHForExactTokens, because you want to get, let's say, 4 tokens out. You just want the router to tell you how much will these 4 tokens cost you. You don't want to do "give me all the tokens I can get for x Ether". At the end, if you really want the 4 tokens, you really don't care how much it will cost you in Ether.
Depending on your use-case scenario (buy/sell), there are also other functions in the router to swapExactTokensForTokens, swapTokensForExactTokens, swapETHForExactTokens, swapTokensForExactETH, ... Let's stay for now with the buy side, swapETHForExactTokens: ETH in, Tokens out.
Let's have a closer look at the function, especially this line:
amounts = UniswapV2Library.getAmountsIn(factory, amountOut, path);
This will calculate the amount you need to provide in - so providing some Ethers (or WETH, which are automatically converted) in, given you want x Tokens out. The path is an array of addresses between swaps, in this case: [wethAddress, tokenAddress].
Conveniently, we don't really need to know how that function internally works, although you can definitely have a look here. It get's the reserves for each pair and then calculates the conversion rate. This is the little "exercise", which the Uniswap-team left for the reader to do in their docs.
For us, it's important to understand how we can call this function and what do we get back. Again, we don't need to import the whole Router, we just need to generate the function signature in Remix and then call it.
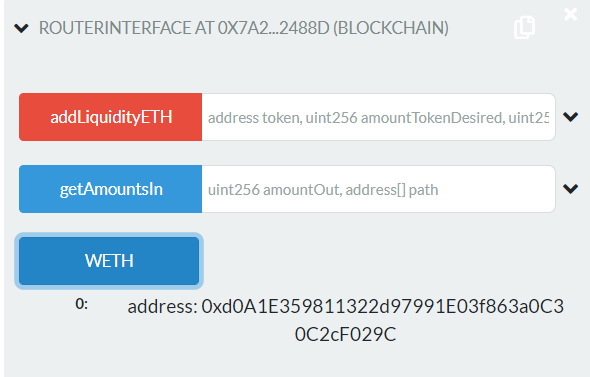
Also, the address of the WETH ERC20 Token changes from network to network, but is saved in a public variable in the Router Contract.
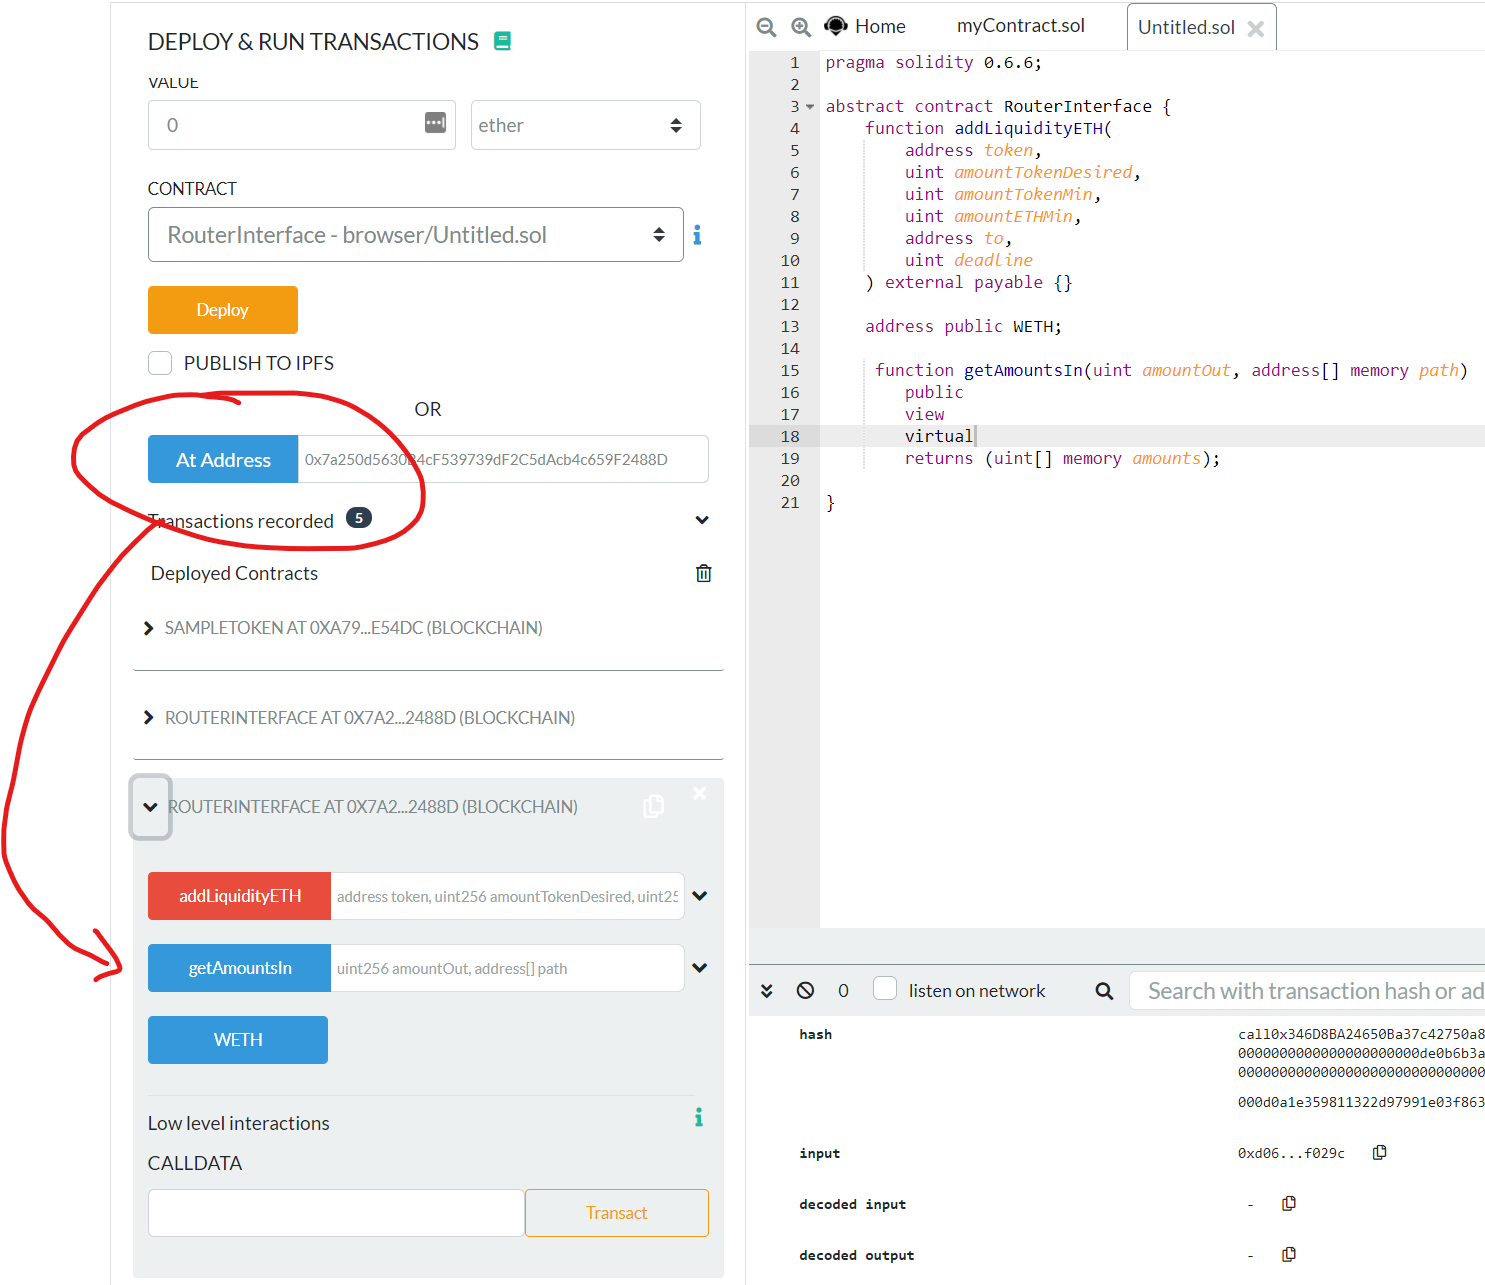
Let's change the existing smart contract in Remix, to get access to those functions:
pragma solidity 0.6.6;

abstract contract RouterInterface {
    function addLiquidityETH(
        address token,
        uint amountTokenDesired,
        uint amountTokenMin,
        uint amountETHMin,
        address to,
        uint deadline
    ) external payable {}

    address public WETH;

     function getAmountsOut(uint amountIn, address[] memory path)
        public
        view
        virtual
        returns (uint[] memory amounts);

}
If we tell Remix again that our smart contract is at the already deployed address for the router, we can interact with it and Remix will take care of encoding/decoding the arguments.
 In order to get a quote Eth for Tokens, we need to get the WETH address first:
 Then we need to call "getAmountsIn" with the amount of token we want to get out so we know how much ETH we need to provide in. Let's say we want to have 1 token (1 * 10^18). What's the price?
- Enter the amountOut
- Enter the path: ["wethAddress","tokenAddress"]
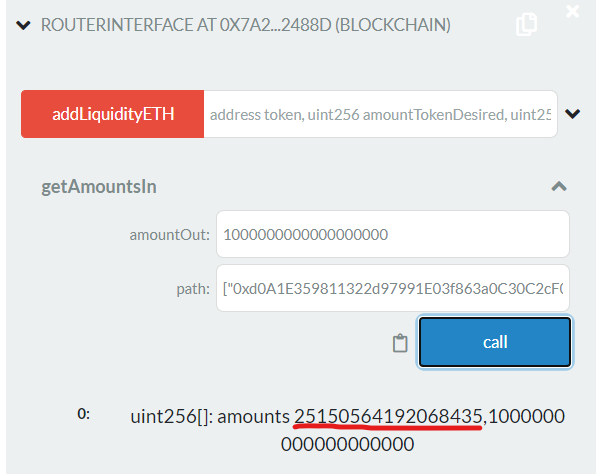 If we run this through an WEI to ETH converter, we get: 0.025150564192068435 ETH for 1 Token. So, why isn't it exactly 0.02 ETH?
- There is a small 0.30% fee
- The execution of this trade will influence the reserves and therefore the constant product formula needs to be adjusted, where the product k must remain constant. This will give you a different price than the price given unchanged reserves.
The more you influence the reserves, the more it will impact the price. The impact is something that can be calculated, but it's beyond what I want to cover here. We can show it though, because it is also conveniently displayed on the Uniswap UI:
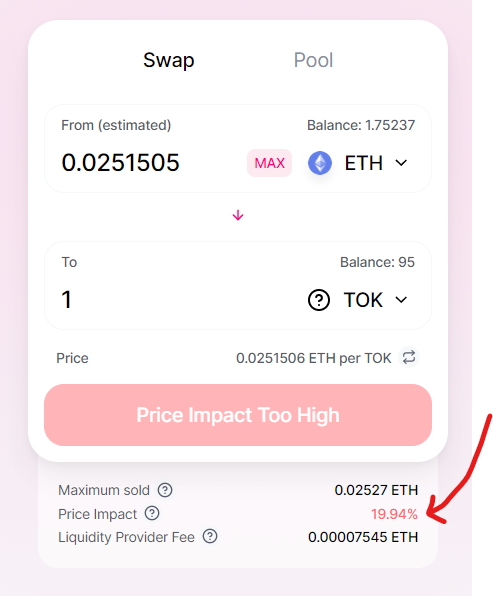 The UI won't even let you swap anymore, because the Price Impact is too high. Let's see if we can swap with the Smart Contracts low level functions.
Executing a swap on Uniswap V2 Programmatically
The last step is to actually execute a swap. That's also pretty easy once you know and understand how the router works. There is just one thing that you might should pay attention to: The "minimumAmountOut", which becomes problematic when you sell tokens.
It's a front running issue or a timing issue. Imagine you get a price quoted, but someone swaps tokens before you can execute your transaction. That can either be in a different block, or it can also be in the same block by re-arranging transactions against your favor. With a minimumAmountOut, which you can set beforehand, you can define a price floor where the transaction fails if it falls below that floor.
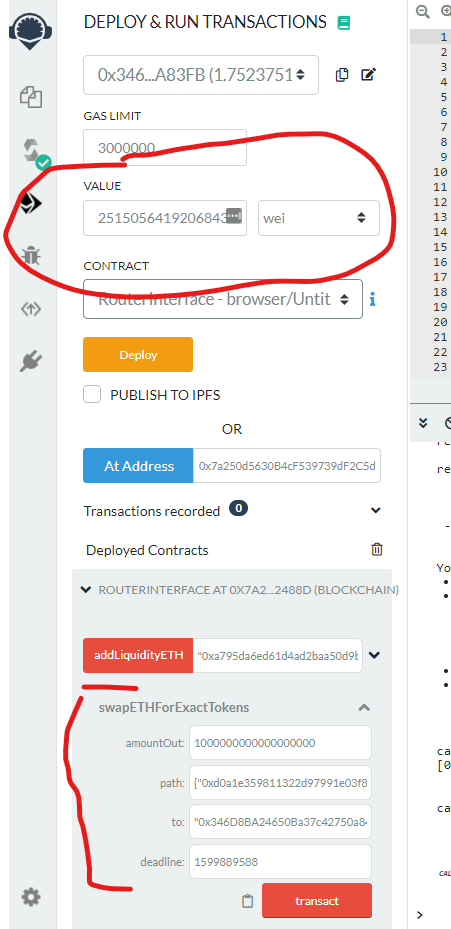
Let's swap some Ether with Remix. Add the function "swapETHForExactTokens":
pragma solidity 0.6.6;

abstract contract RouterInterface {
    function addLiquidityETH(
        address token,
        uint amountTokenDesired,
        uint amountTokenMin,
        uint amountETHMin,
        address to,
        uint deadline
    ) external payable {}

    address public WETH;

     function getAmountsIn(uint amountOut, address[] memory path)
        public
        view
        virtual
        returns (uint[] memory amounts);

    function swapETHForExactTokens(uint amountOut, address[] calldata path, address to, uint deadline)
        external
        payable
        virtual
        returns (uint[] memory amounts);

}
And then use it again with Remix, let's fill in the blanks:
- the amount of Token is with decimals attached, so 1 token is 1 * 10^18
- the path is an array ["addressWei","addressToken"]
- to is your address.
- the deadline is the unix timestamp, which I got from https://www.unixtimestamp.com/index.php and just added a few hundred seconds.
 Soon later you should see a successful swap:
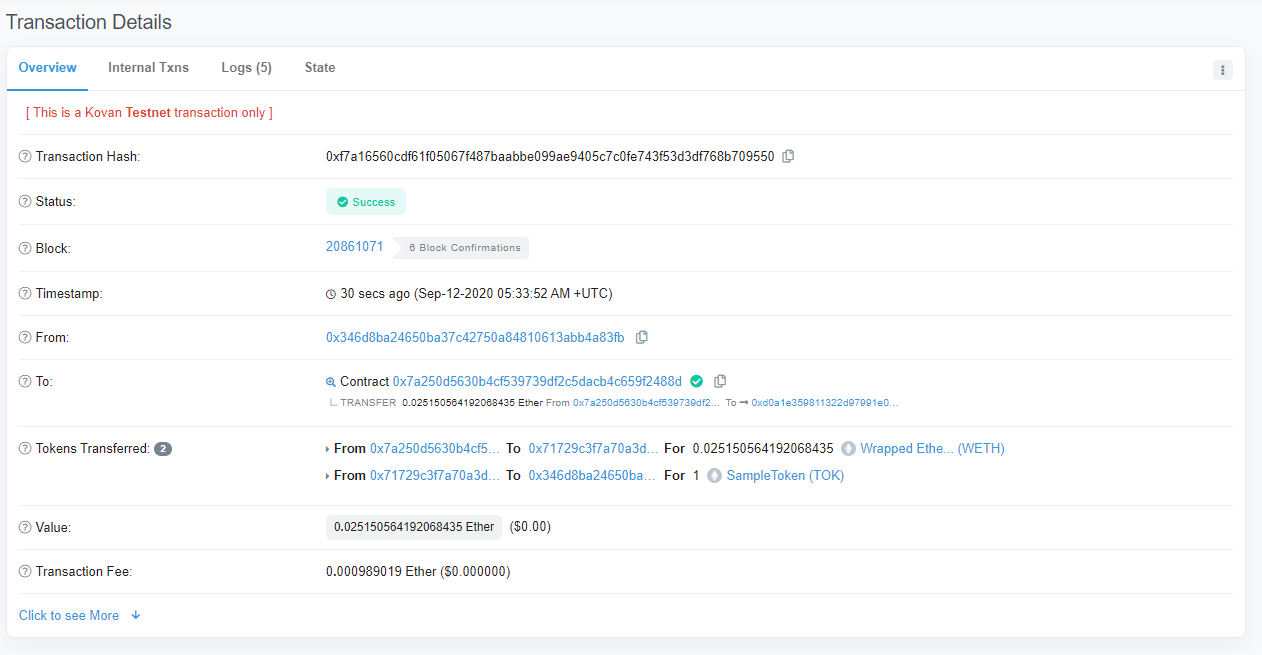 We swapped 1 Token against Ether programmatically.
But what about the minimum token amount, which I was talking earlier?
Let's say you want to swap tokens for *exact *ether. Then you would use the function
function swapExactETHForTokens(uint amountOutMin, address[] calldata path, address to, uint deadline)
  external
  payable
  returns (uint[] memory amounts);
In this case you send an exact amount of Ether to the smart contract and expect a certain amount of tokens back. The same is obvious for selling tokens for ether:
function swapExactTokensForETH(uint amountIn, uint amountOutMin, address[] calldata path, address to, uint deadline)
  external
  returns (uint[] memory amounts);
If you liked this article then feel free to share it and connect with me on LinkedIn.
Live Integration
If you're interested in some free airdrop tokens on Morpher, then signup today (it's free and you get paid for it, no kidding!). And see the integration in a live App! [
Morpher - Trade 24/7 with Zero Fees and Infinite Liquidity
Discover your trading edge with 24/7 Stocks. Go long and short on global stocks, crypto, forex, and commodities. Zero Fees. Start Investing with $1.
![]() Trade 24/7 with Zero Fees and Infinite Liquidity
Trade 24/7 with Zero Fees and Infinite Liquidity
](https://www.morpher.com)
Also, as I'm working for Morpher: if you like this article, I'd be delighted if you could spread the word about us.